
With more than 512 million monthly active users, Pinterest is a visual discovery app that can help drive significant business results. Unlike social media platforms like Facebook or Twitter, where users primarily connect with friends, Pinners are actively searching for information, ideas, and inspiration.
This makes Pinterest more of a search and visual discovery engine. Because users are already looking for what to do or buy next, marketing your business on Pinterest is a natural fit. This guide will walk you through how to schedule pins effectively using both Pinterest’s native scheduling features and third-party social media scheduling tools like MeetEdgar.
Table of Contents:
- Why Schedule Pinterest Pins?
- How to Schedule Pins via Pinterest’s Native App
- How to Schedule Pins with MeetEdgar
- Best practices for scheduling Pins
1. Why Schedule Pinterest Pins?
Scheduling Pinterest pins offers numerous advantages, making it an essential part of your social media strategy. Here are some key benefits:
- Inspire Shoppers: Pinterest is a platform where users look for inspiration on what to buy next.
80% of weekly Pinners say they feel inspired by the shopping experience on Pinterest
By scheduling your pins, you can ensure that your content reaches potential shoppers consistently, inspiring them with your products or services.
- Wide Audience: With over 512 million active users, Pinterest provides a vast audience for your content. Scheduling pins ensures that you reach this wide audience effectively, maximizing your visibility and growing your traffic.
- Consistency: Maintaining a regular pinning schedule keeps your audience engaged and helps grow your followers. Scheduled pins ensure your content is consistently shared, reinforcing your presence on Pinterest.
- Time Management: Save time by planning and scheduling pins in advance. This allows you to focus on other critical tasks like content creation and strategy planning.
- Content Planning: Scheduling pins allows for better content planning, helping you maintain a balanced and cohesive social media strategy. You can schedule a mix of promotional, educational, and entertaining content.
How to Schedule Pins via Pinterest’s Native App
If you have a Pinterest business account, you can schedule Pins on desktop or mobile up to two weeks in advance. Keep in mind that you can schedule only one Pin at a time, and you can have a maximum of 100 Pins lined up for the future. Here’s how to do it:
Step-by-Step Guide:
- Log in to Pinterest: Open Pinterest on your desktop or mobile device and log in to your account.
- Create Your Pin: Click on the “Create” button at the top-left of your screen. If you have a business account, select the hamburger icon and then under Create, select “Create Pin.”
- Upload Your Media: Click the arrow circle up icon to select an image or video for your Pin. You can select up to 10 images, with each image creating a new Pin.
- Access Scheduling Options: Click on the “Publish at a later date” option.
- Select Date and Time: Choose the date and time you want your pin to be published. Pinterest allows you to schedule pins up to 30 days in advance.
- Confirm and Schedule: Once you’ve set the date and time, click on “Schedule” to finalize your pin.
Currently, natively scheduled Pins can’t be edited. To make any changes after scheduling, you have to delete the Pins and schedule new ones with the desired changes.
How to Schedule Pins with MeetEdgar
Pinterest is a powerful tool for small business owners, especially those of you who use content marketing to grow your business. If you’re brand new to Pinterest, here’s a quick guide on Pinterest and how you can get started using it with MeetEdgar.
How to Connect Your Pinterest Account to Edgar:
Connecting your Pinterest account to MeetEdgar can be done in just a few simple steps! First, we recommend you have a Pinterest Business Account. Edgar will post to your personal Pinterest account but if you are using Pinterest to promote your business, then you should convert to a business account. Pinterest Business Accounts are free and you’ll have access to more detailed analytics about what Pins are working. Not to mention, you’ll have the ability to schedule video Pins from Edgar.
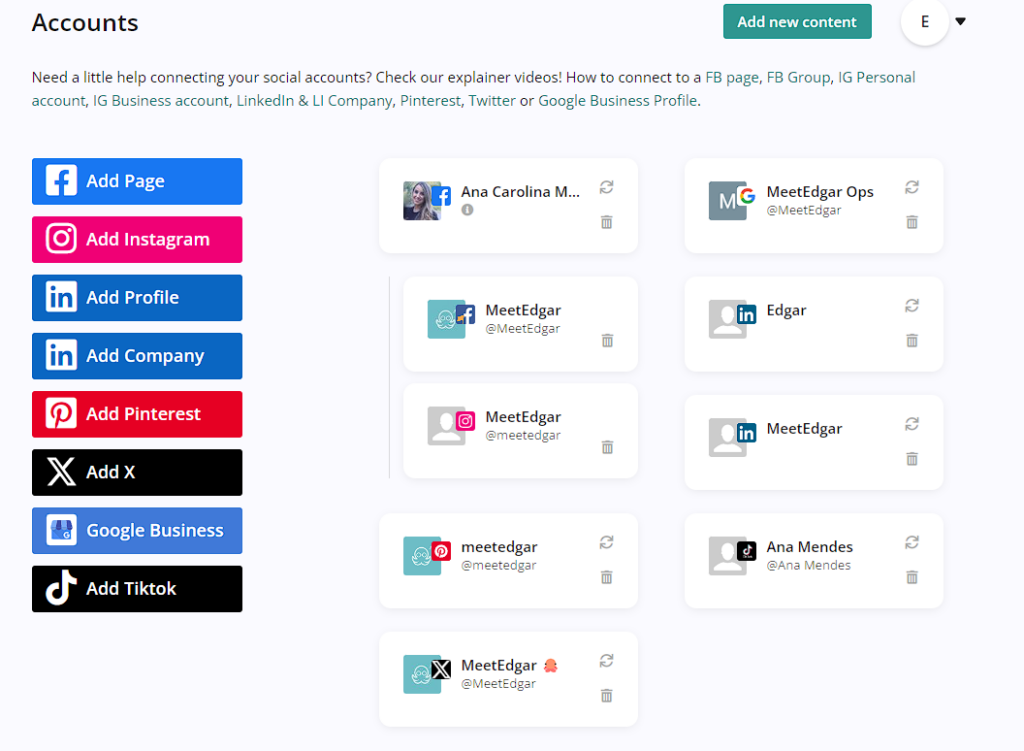
Now, let’s get your Pinterest accounts connected to Edgar! Click to your accounts page and select “Add Pinterest” from the options. Then a Pinterest prompt will appear asking you to authorize Edgar. Once you do that, you’re all set!
How to Schedule Pins to Pinterest from Edgar
Let’s get to the fun part of actually adding your Pins into Edgar!
The first step is to choose the category you want the Pin saved to. Remember, this will help Edgar know when to post your Pin if you use the recurring schedule and it keeps your Pins organized in your library if you want to go back to edit or add variations to them.
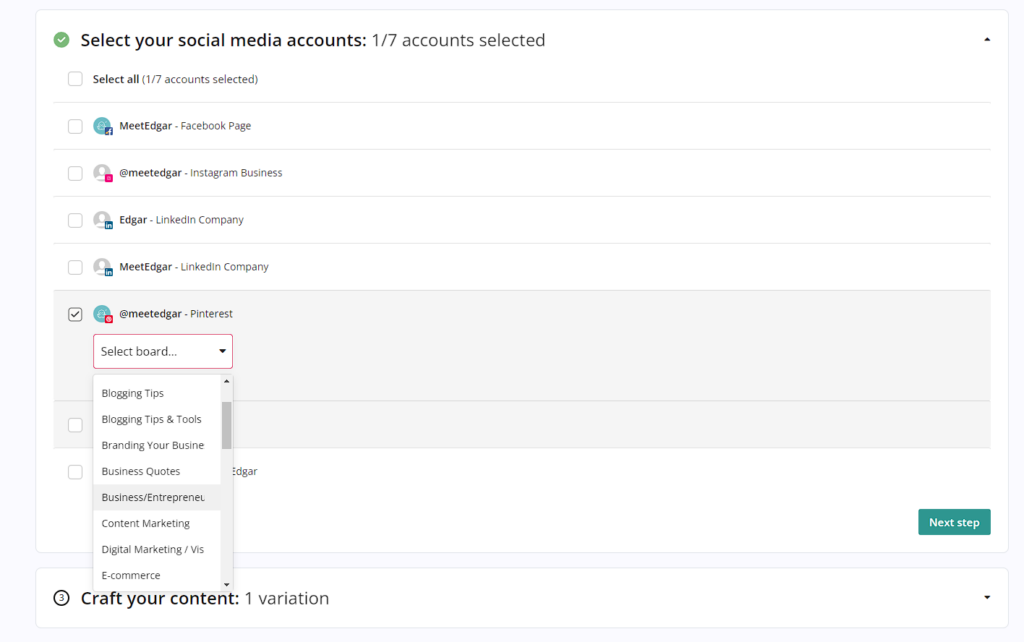
Select “Add New Content” to pull up the composer page, select “Pinterest” in the accounts section. Once you’ve selected Pinterest, you’ll be able to choose the board you want to publish to. Just click the Select the board drop-down menu to choose your board.
Then, you can upload the image or video you want to Pin. (If you want to publish a video, you have to have a Pinterest business account. But we gotchu, just scroll back up to learn how to turn your personal account into a business account). If you enter a link in the description link box, then Edgar will automatically pull any images from that link and you can click any of those images to add it as the Pin or you can upload a separate image.
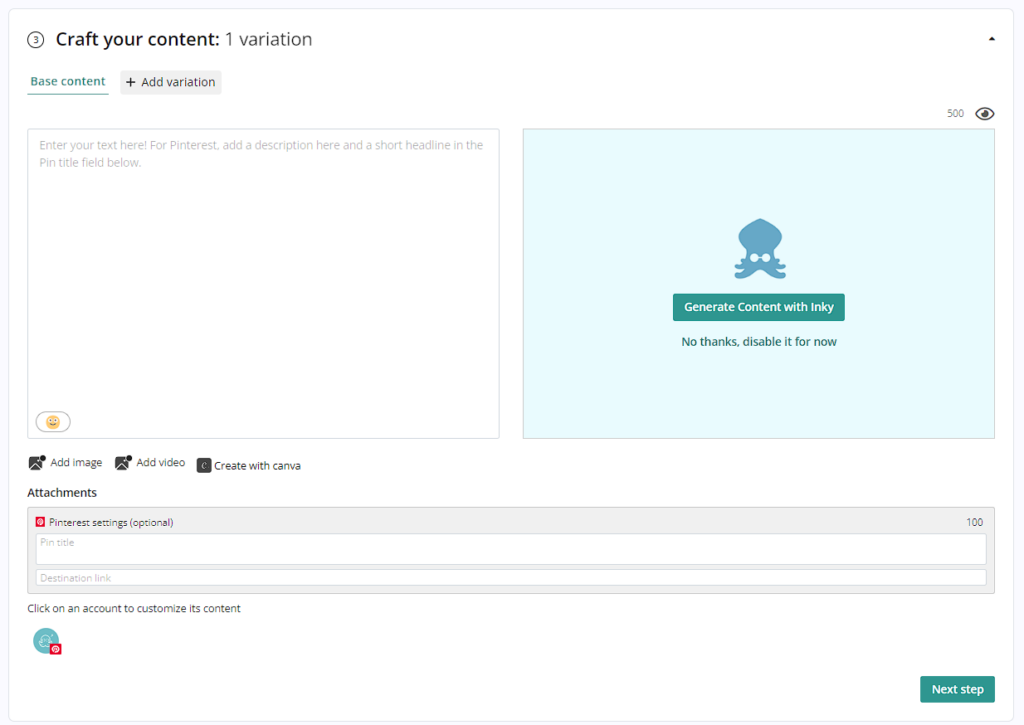
Once you have your image or video ready to go, you can add your Pin title, link, and Pin description. The Pin title and Pin link are in the “Pinterest settings” box under Attachments. The title is optional. If you don’t enter a title, Edgar will pull the title from the title tag of the link you share. We recommend adding one because titles are super important on Pinterest! They show up beneath your Pin on the feed. Make your title catchy so users want to stop their scrolling to look at your Pin.
In the “Post” section, you can write your description. You want your description to be descriptive about the content as you can and to include a keyword or the brand name in the first sentence. But don’t stuff keywords into your description! Make it natural. The goal is to get people to click your link and save your Pin so your description should be to the point and, well, descriptive.
Then we recommend adding variations for each of your Pins. Why? Pinterest prioritizes fresh content and a “Fresh” Pin is defined as images or videos that haven’t been posted before. But you want to be consistently driving traffic to your link and you may need more than one Pin to do that. That’s why we recommend using our variations feature to create more Pins.
With variations, you can add different images, videos, and descriptions to create different Pins. That way, Edgar can consistently Pin for you, helping to drive more traffic to your links while staying in line with Pinterest guidelines and you can keep all the Pins for that link organized together.
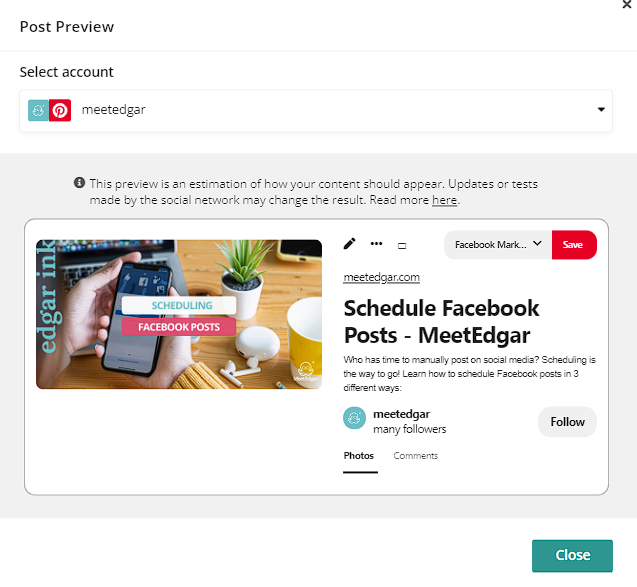
You can also preview your Pins if you want to see how they’ll look on Pinterest. Select the Eye icon in the right corner of the variation.
Once you have your Pins ready to go, you have three different options for scheduling your content: “Save to Library,” “Send now and Save,” or “Schedule send and save.”
If you select “Save to Library,” then your Pins will post to Pinterest at the selected time you chose in your recurring schedule.
If you select “Send now and Save,” Edgar will post the Pin to Pinterest right then, and then, he’ll save it to your library if you want to re-save the Pin to your library later or add variations in the future.
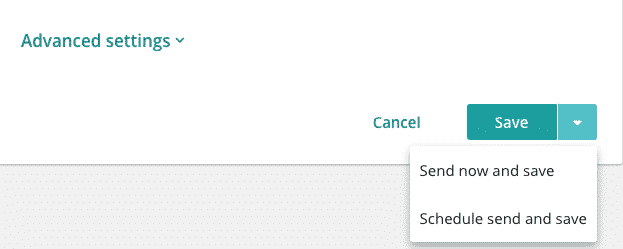
If you select “Schedule send and save,” you can choose a time and date in the future for your pin to post, and then Edgar will save the Pin to your library if you want to re-save the Pin to your library later or add variations in the future.
How to Set Up Your Pinterest Schedule in Edgar
Let’s say you don’t have the time to manually schedule all your pins. We have the solution: setting time-slots. The first thing you’ll want to do is create your recurring schedule. You’ll see more success with Pinterest if you save Pins consistently rather than all at once. So we recommend setting up your weekly Pinterest posting schedule in the Schedule section of your Edgar account so Edgar is saving Pins on a regular basis for you.
You can create new categories for your Pinterest scheduling or use an existing category. You can even create a category for each board so that you’re posting to all of your Pinterest boards on a consistent basis.
You can create new categories for your Pinterest scheduling or use an existing category. You can even create a category for each board so that you’re posting to all of your Pinterest boards on a consistent basis.
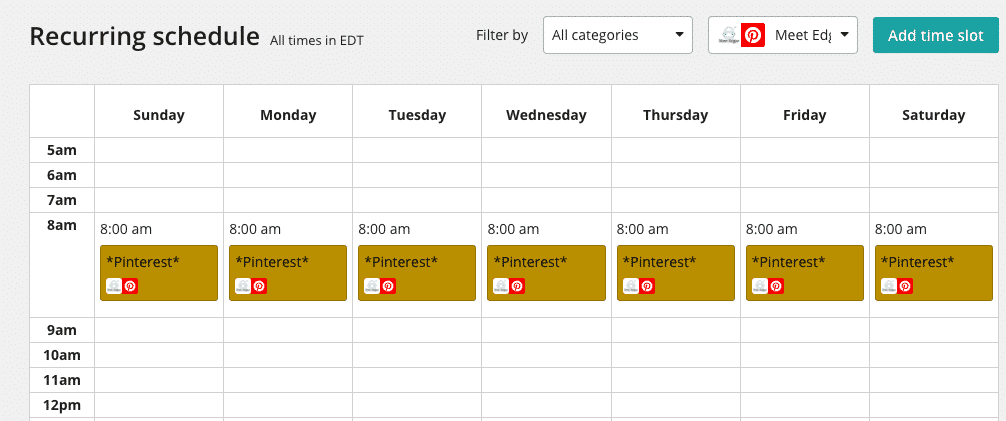
There’s no perfect time to post to Pinterest so instead of worrying about the best time to post, we recommend finding a consistent frequency where you can regularly share great Pins. You want to Pin often but you don’t want to Pin so much that you feel like you’re in constant creation mode.
Best Practices for Pinterest
- Create visually appealing Pins: Pinterest is a highly visual platform. Ensure your Pins are high quality and visually engaging to attract more clicks and repins. Use bright colors, clear images, and compelling graphics. Eye-catching designs will stand out in users’ feeds and increase engagement.
- Pin based on your niche: Make sure your Pins align with your niche and are relevant to your target audience. This will help in attracting the right followers and driving engagement. Tailor your content to the interests of your audience and ensure it adds value to them.
- Include SEO keywords: Optimize your Pin titles and descriptions with relevant keywords to increase their visibility in search results. Use Pinterest’s search suggestions to find popular keywords. This practice will help your content appear in relevant searches and attract more viewers.
- Don’t neglect your Pinterest boards: Keep your boards organized and relevant. Regularly update them with new Pins and ensure that they reflect your brand’s current offerings and interests. Well-maintained boards can improve your profile’s overall appeal and help visitors find what they’re looking for.
- Keep up with trends: Stay updated with the latest trends on Pinterest and incorporate them into your strategy. Engaging with trending topics and categories can significantly increase your visibility and attract more users to your content. Follow popular boards and users in your niche to see what’s trending.
And there you have it! You saved your first Pins and you’re all set to supercharge your Pinterest strategy by scheduling your pins with the chosen method! Independent of the method, the truth is that Pinterest can be a great ally to your brand. So make sure to include it in your strategy.
Each method—whether using Pinterest’s native scheduler, or a social media automation tool like MeetEdgar—offers unique benefits. While using the native app is best for users who need a straightforward and free method to schedule Pins directly from their Pinterest account, tools like Edgar provide the most value for comprehensive social media management across multiple platforms, making it an excellent choice for businesses looking to optimize their entire social media strategy with social media automation tools.
Get started scheduling Pinterest pins with Edgar (and automating all of your social media scheduling) FOR FREE with a 7-day trial! Sign up here!