Table of Contents:
Master Open Graph Tags To Make Your Content Shine

Table of Contents:
Tired of creating tonnes of great content but not sure how you can actually make it stand out in a really powerful, authentic way? Adding something called Open Graph tags to your website and to your blog is one of the most underrated ways to do this. Once you create all of your amazing content and your new blog posts, the next step is to get that content out into the world. And as you all know, sharing it on social media is one of the most effective, as well as the most cost-effective ways to do this.
Do you know how to use an open graph tag to your advantage? Keep reading to learn everything you need to know about OPen Graph tags along with some Open Graph examples.
What Are Open Graph Tags?
Open graph tags are bits of code used on social media websites that control the way a URL is displayed. When you share a link on Facebook or Twitter, for example, the way that link looks on your feed depends on your use of Open Graph tags.
Promoting Your Content on Social Media
The huge audiences on Facebook and Twitter and LinkedIn that Edgar works with make these really the best platforms for sharing your content. But how can you optimize the potential reach of your posts with Open Graph tags? By simply making sure your content always has the images and engaging titles.These Open Graph meta tags have never been more important on social media, since we live in such a visual world. You can't really go about posting something without a photo on it anymore. Posts with images gain way more engagement than even video or text-based updates. 93% of the most engaging posts on Facebook are those with photos added to them, you can expect about 53% more likes, 104% more comments and 84% more click-through rates on posts that have photos and a link attached to them.
Why Are Open Graph Tags Important?
Not only do OG tags help with the visual side of social, but also allow you to post shorter status updates because the photo and title that are generated from these tags do the work for you. This is important, because, in general, along with visual content being king on social, shorter text in your status updates can lead to up to 23% more interaction rates than longer posts. Of course rating shorter posts isn't just handy for Twitter, as well.
In the fast-paced world of social media, keeping your posts below 280 characters on any platform can really get you way more engagement.
Some sites even say up to double the engagement that a post with longer and more text does. Of course, everyone's audience is a little bit different, and we always want you to think of social media as an experimenting place, something that you really want to continuously get to know your audience and keep an eye on how your posts do. Open Graph images can really help you keep that text part of your status update short and snappy to get your follower's attention and to really stop them from scrolling through their feed.Another reason Open Graph tags are so important on social media is because of a change Facebook made back in July 2017.
The change was made to try to cut down on clickbait, meaning that no one can change the photo, title or description of your post associated with the link preview anymore. This click-through bait that Facebook is trying to avoid is based on the truthfulness of what your content is going to provide someone when they get to your page. So having this preview rather than just a static URL can help people decide that your link is trustworthy and worthwhile to click on.
This is great as it gives you full control over how your links show up when other people share them as well. However, there are no Open Graph data there. The social network, when someone shares your link, is going to have to guess which content is important, and sometimes, it can be pretty off.You’ve all seen posts with something that's a little bit too long that you can't read the full title, or their image there is a little bit strangely cropped. This typically has to do with the lack of Open Graph tags on their site. So by making sure you add these Open Graph tags to your posts, the only person who can decide what your link preview looks like is you. Not someone else sharing your link, not Facebook in general, but you're setting these standards. So it not only ensures that your post looks really good when you or other people share them, but it also really helps increase what's called your kind of trust factor of your links.
Open Graph Tags Facebook
Facebook introduced Open Graph tags in 2010 to promote the integration between Facebook and other websites. Since then other social media sites are also taking advantage of social media and meta tags.
Again, you want to make sure that it's going along with the link trust. The added benefit of link trust we just mentioned is really about people being able to see and know what your preview is going to provide them, especially if you are using a link shortener.
You know, thinking about posting a Bitly link or something shortened by our own link shortener here at Edgar, Ed.gr. It's hard for people to tell if they trust that link to click on. So, for bloggers especially, this is a great preview to show your followers what content they're going to see when they click through to your site. So you really want to make sure it represents the article, or if you're not a blogger that it represents your item that you're selling or your service that you're selling as closely as possible. Leading people to unexpected content can really erode someone's trust in you in seconds.
So you want to make sure that it's not unrelated texts, and the images that are being pulled through are not only eye-catching, but also have to do with what the people are going to see when they actually go to your site. Learning all about Open Graph tags and adding these to your site can really help you avoid these pitfalls of clickbait that Facebook and other networks are trying to cut down on. Let's get something out of the way first here. Rest assured, you do not need to be a developer to know how or know how to code in order to your previews and those OG image tags added to your site.
Open Graph Tags Example
Skip to minute 6.44 in the video above to see a source code from an Edgar blog post. As you can see, this highlighted section, right in the middle of the page shows the meta tag there for the Open Graph image element. This URL that's been added after that section is the URL of the image that's stored that we would like Facebook and LinkedIn and Twitter to pull in as part of our preview. So if you are a tech-oriented person or if you have a web developer who's helping you with your site, this is one way you can add OG image tags in. These go into the header section, between your two head tags of your HTML code, along with your other metadata that you're using for SEO purposes in there.
But as we go along here, you'll also see there are much easier ways to add this in if you're not familiar with the web code in the back end of your site. So for marketers, the thing to keep in mind is if you want to ensure your thinking about how these tags can represent the content of your page. For example, on your homepage, your tags should contain things about the site as a whole, while the tags on your event page or your blog post should really focus on the nature of the story.If you are adding these in as just code to the back end of your site, we'll break this post down here. So here's what they look like. You can see if we're going to do this with a little code and a header section. Each of these sections will be added in between the two head tags.
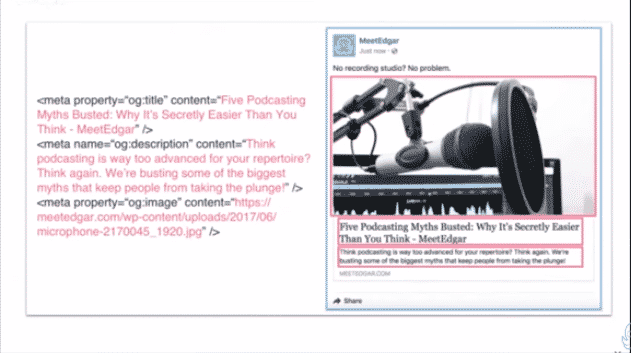
From this post, you can see the title right up top there. The tag that marketers should really focus on is the headline. You know, something short and snappy that's going to grab the attention of anyone who sees this. There are a couple of other fancy things that you can do with this, but essentially, there's no limit to the number of characters you can have in your title.We recommend staying between 60 and 90 characters. If your title is any longer than this, thinking about over 100 characters, Facebook will typically truncate this to around 88 characters. So keep that in mind when you're trying to think and brainstorm the different headlines for the articles that you are writing.
This is going to be something that shows up bold, right there, in someone's face, so a great way to grab attention on Facebook. The next tag that you see down there is the Open Graph description tag. If you've done any coding work on your site before, the descriptor tag for the metadata that you've added to your website is quite similar to this. This is where you're going to describe the content.But instead of showing up in like a search engine result, if you have this as an OG tag, it's going to show right below the Facebook title there, just giving a little preview of what it's about.
Again, you're not limited to any character count with this description tag either, but as you're starting to put this in, we recommend using around 200 letters. In some cases, depending upon the domain, Facebook might display up to 300, but we do suggest keeping it between that 200 and 300 to really make sure everything you're typing in there shows on the preview once it's sent to Facebook.
Open Tag Images
So now down to the last and what I consider most important and interesting Open Graph tags for many marketers is going to be the photo that shows there. This is always going to help your content stand out the most, and this is going to ensure that you have that particular thumbnail that's going to be shown to your followers when it's shared that you think will really help you get the most conversion rates or the most click-through rates there. Make sure the Open Graph image that you choose will be something that's going to be really eye-catching, something that's either going to provide interest to what the article is, spark a little bit of conversation on the post itself.
And again, if you don't add these Open Graph tags into your site, Facebook will either share it just as a link, or it's going to make up and try to guess what photo you want to be added, which can often lead to something that's either a little bit awkward like an unwanted banner or a small logo from your site rather than just the photo that would go along best with your blog post. If your page is static, and you don't use any sort of content management system like WordPress, you'll need to change those Open Graph image tags manually with the code in the above image.
If you do have a great blog CMS system like WordPress, there are a lot of plugins to make this such a simple process. A reliable hosting provider can also ensure that your website runs smoothly, allowing your Open Graph tags and images to load quickly for the best user experience.
The Open Graph image tags are assigned automatically for each page with many of these plugins. The way we here at Edgar use WordPress og tags, especially for WordPress blogs, is with the WordPress SEO by Yoast plugin.Super simple. So once you go ahead and install this plugin on your site, you can see here it's a pretty neat and tidy and super user-friendly way to go ahead and add these details into your blog.

The plugin will then translate this into Open Graph tags for your post, so you don't have to work with that code that we looked at before. This is essentially adding these to that head section with those meta tags, except in a way, that's much easier to understand here. You can see you'll add in the Facebook description, again, recommending, keeping that between 200 and 300 characters. The Facebook image will just be a link to where that image lives, and then, again, that title will be generated there for you.
So when you're first setting this up, if you're interested, and if you did it right, and for a couple of other reasons, there’s something you can use called the Facebook Open Graph debugger. So without having to post it on social, this is also a great place to see what the preview was going to look like. Just Google Facebook Debugger, it'll provide this URL for you, this is available to anyone. You don't have to have a special license or anything to use it, and this allows you to put in your URL or link that you'd like to check, and it returns any errors and suggestions for the OG tags.

If you do have any errors, it'll tell you like, "Hey, your image is too small or too large," or, "Hey, we didn't detect an OG image tag," stuff like that, and that'll just live in that little section with the warnings there. Typically, these are really helpful in order to get and maintain that image, again, is going to be the main one that's going to come back with errors if something is wrong with it. So check it out there if you are setting this up for the first time. It's also worth bearing in mind that this is really useful, if you haven't added these tags before, or if you are changing the OG image tag on your site or on your blog post.This has to do with the fact that Facebook only scrapes your webpage once. So if you have to make changes to your Open Graph data, you'll need to manually ask Facebook to scrape your content again, which is going to be done by the Facebook opengraph debugger.
When you're using the debugger, another thing to think about is that if you usually share this link as a Bitly link or a short link, you can also have Facebook scrape the Bitly or short link here. It'll understand that that link forwards to your page, so it's a great way to test and make sure that the Bitly link is also pulling in the proper tags.Why this is so important? After you change the image, that Open Graph image tag on your site, using this debugger and scraping your image again essentially clears the Facebook cache. So it's clearing Facebook's memory of what image to use. Simply because of the way that Facebook is really optimized to get a quick preview showing in your newsfeed as you're scrolling along, it benefits them to hold on to this memory of what image is used for each link. So, the first time, even if you haven't shared your blog post on Facebook, if someone else has, the first time that link is shared, the image attached to it is going to be the image that's shared each time.
Clearing the cache will allow you to add a new image. Imagine this. You're posting a link to Facebook, but then you see a mistake in the thumbnail. So you go back to your site and you adjust that OG image tag, and you post it on Facebook again. Probably nothing will have changed. That thumbnail will still stay the same and that's because of the cache we just chatted about. The Facebook Open Graph Debugger here is going to actually refresh that cache on the links after any adjustment you made. So remember to do this each time, if you do actually end up changing the image. Again, if you don't remember what this actual URL is, feel free to google it, or you can always email Support@MeetEdgar.com, and we're happy to go along there with you.
But essentially, you'll notice that little URL bar there, in the Sharing Debugger, click on debug, and then you'll go down to where it says "Scraped," and you can click that Scrape Again button to refresh that cache and make sure any changes you make do show up for your link. Cool.So you'll also always want to remember that just having the preview set up on your post is fine, but to really elevate that post and get the most out of your post, we also still want you to introduce adding your own commentary to a link, providing your own spin on something. There's so much noise out there on social media these days that introducing your own voice is the strongest way to get your content to stand out.So with Facebook's algorithm is really focused on connecting people with people more than anything. This doesn't mean that they're going to stop showing Facebook pages, posts, or Facebook group posts, or rest assured, your content will still matter on Facebook. It means they weigh your posts more on comments and between people and between people and people rather than just likes and passive shares.
So, comments are not as passive as other reactions like likes and shares.They're an active process that you really want to start thinking about how you get your audience not only engaging with the post in your brand, but Facebook wants to see people engaging with each other more too. So always keep in mind how you can introduce a post, nowadays, in order to get your followers to talk to each other. Whether that's introducing it with a question or sharing your own experience, get people to share their opinions and create a community around that post.
Open Graph Tags LinkedIn
LinkedIn also goes off of the same Open Graph tags that Facebook does. So, if you make your site shareable for Facebook, Linkedin is also going to be able to scrape and pull in those same images. So by giving your link an image and a title in a description through Open Graph image tags, you're providing people with that contextual information that'll make them want to click through to your blog or site.[sc name="ad1"]
Open Graph Tags Twitter
Next, we'll move on to why opengraph tags matter on Twitter. With over 300 million users, Twitter is really one of the biggest essential networks that we want to make sure you're sharing your content on as well.Twitter has their own meta called Twitter cards, which accomplish the same Facebook link preview. Twitter is great to help you connect with people. It's pretty instant, and it really, really does drive a lot of traffic to your blog, if you're using it properly. One of the ways that we consider using it properly is having what we call Twitter cards installed. Twitter does handle Open Graph tags slightly differently than Facebook. They can still read those tags if you have them on your site. However, to optimize your posts on Twitter, we're going to ask that you install what is known as Twitter cards on your website. The nice thing about Twitter cards is once you've set them up for a particular page or post, you're done.After that, each time someone tweets that page, your Twitter card gets attached, and it'll provide a nice, lovely, beautiful, visual post up on Twitter rather than just a small URL. You know, in the same way that Facebook grabs a thumbnail in title and description when you post a link, Twitter's crawlers are automatically going to attach those to your cards and tweets. So let's go into how you can do this in a way that you have full control. First of all, there are a couple of types of cards. Whether you have Twitter cards set up or not, you've likely seen something like this pop up in your feed. They take the plain text of a tweet, and they expand it into something that stands apart from other tweets, which can really help capture interest and click-through rates quite a bit more. One of the best parts of Twitter cards here is also that they allow you to have your status post on Twitter be a little bit longer because that card will already contain the title and description, similar to how Facebook does. So, these no longer have to take up those precious characters in your tweets, and you can focus more on the wonderful and compelling, humorous and interesting stuff that sounds like it's coming from you rather than just sharing the link with the title of your post.Creating an engaging feed full of your brand's personality with the colors that Twitter cards produce really allows your followers to connect with your brand in a more meaningful way. Cool. So there are five types of Twitter cards, but we're going to just cover two of them here, and these make the most sense for bloggers and websites and software-as-a-service companies, and that's your summary card and your summary card with a large image.
What Is The Twitter Summary Card?
The summary card is the default that most bloggers will likely choose. It shows a small image that's offset to the right, and all of the text is going to be below it. Very similar to how Facebook works.
What Is The Twitter Summary Card With Large Image?
The summary card with a large image is going to be a better option if you are a company with really fascinating awesome big images to share. The difference here is that a large image is just going to be above the content. When someone hits that, view content and they go through, that large image will be kind of what's going to be grabbing their attention the most. Cool. So to set this up, similar to how we suggest doing this for your Facebook posts, we'll suggest doing this through your Yoast plugin.
Twitter Open Graph Tags on WordPress
This is a really awesome way to do it just because it's such a simple process. You'll go ahead and go into your WordPress site and go to your Yoast plugin section and click on the social settings under the menu. You'll then see a Twitter tag popup that you see here right next to that Facebook one, and you'll see the option that says, "Add Twitter Card Metadata." Make sure this checkbox here is checked off, and then you'll input your Twitter username, so your Twitter handle there, and select the default card type that you'd like to use.
Either a summary card with a small image or a large image. Once you've selected the type of card you want to use, you'll need to hit Save, and then, you're going to want to clear your website's cache. This will allow these changes to be saved and allow Twitter cards to then be established for all of the posts on your site. Once you've marked up that first page of your posts, you'll need to paste the link into Twitter's card validator. You can see at the top of this, here, where you have that note from Twitter cards to work, that you have that hyperlink to the Twitter card validator there. It’s just like a Twitter Open Graph tester.
This is a really important part of the process just because you do have to get approval from Twitter, and this is going to be one of the ways that you can also see what that card is going to look like to make sure you have it set up right on your site. You only have to do this once for each type of card on your entire website.If you do not have the plugin setting up Twitter cards manually does require a bit of coding know-how. You'll essentially add the code to the header section, similar to how you do it on Facebook, and this is probably a good task to hand off to your tech-savvy person, if you are leery of jumping into that HTML code on your site.
So once you get to the Twitter validator, the URL is up there. Of course, you can just Google Twitter validator or reach out to Support@MeetEdgar.com, and we'll point you in the right direction. Put your URL right into the section under the card URL you see, and click ‘preview card’. That’s it!
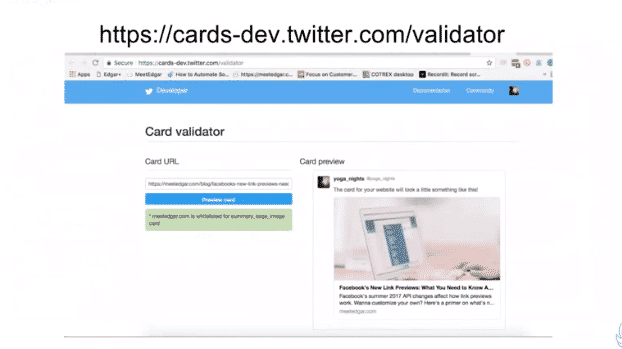
Your card will be validated, and you can see what it looks like once people are posting that link to Twitter. Anyone sharing your content from their site on Twitter will not just be sharing the line of text; they'll actually be sharing that eye-catching image that you put in there, along with the title and description giving people an idea of what they're going to see when they click through.
Keep in mind, the importance of providing value and content marketing on Twitter matters not only for brand awareness but because people who follow brands on Twitter are 69% of them are actually likely to purchase that service or item. Having these meaningful touchpoints and providing people with this valuable information that you've already got on your website can just help increase that likelihood of conversion for your followers.
Test Your Content Links Before Publishing
So as you’ve now learned, there are loads of ways for you to test your Open Graph meta description and image on posts you want to share for social media. It makes your posts look more appealing to click in and can drive engagement and even sales. Do you use an Open Graph plugin or an Open Graph validator? We’d love to know more in the comments!

Subscribe to our newsletter
Are you ready to automate your socials?
Say goodbye to manual scheduling and hello to effortless automation.
